You’re reading Ry’s Objective-C Tutorial |
Introduction
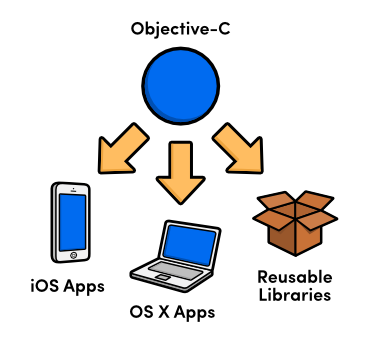
Objective-C is the native programming language for Apple’s iOS and OS X operating systems. It’s a compiled, general-purpose language capable of building everything from command line utilities to animated GUIs to domain-specific libraries. It also provides many tools for maintaining large, scalable frameworks.
Like C++, Objective-C was designed to add object-oriented features to C, but the two languages accomplished this using fundamentally distinct philosophies. Objective-C is decidedly more dynamic, deferring most of its decisions to run-time rather than compile-time. This is reflected in many of the design patterns underlying iOS and OS X development.
Objective-C is also known for its verbose naming conventions. The resulting code is so descriptive that it’s virtually impossible to misunderstand or misuse it. For example, the following snippet shows a C++ method call with its Objective-C equivalent.
// C++john->drive("Corvette","Mary's House")// Objective-C[johndriveCar:@"Corvette"toDestination:@"Mary's House"]
As you can see, Objective-C methods read more like a human language than a computer one. Once you get used to this, it becomes very easy to orient yourself in new projects and to work with third-party code. If you’re a little bit disarmed by the square-brackets, don’t worry. You’ll be quite comfortable with them by the end of the tutorial.
Frameworks
As with most programming languages, Objective-C is a relatively simple syntax backed by an extensive standard library. This tutorial focuses mostly on the language itself, but it helps to have at least some idea of the tools that you’ll be interacting with in the real world.
There are a few different “standard libraries” out there, but Apple’s Cocoa and Cocoa Touch frameworks are by far the most popular. These define the API for building OS X and iOS apps, respectively. The table below highlights some of the key frameworks in Cocoa and Cocoa Touch. For a more detailed discussion, please visit the Mac Technology Overview or iOS Technology Overview.
| Framework | Description |
|---|---|
| Foundation | Defines core object-oriented data types like strings, arrays, dictionaries, etc. We’ll explore the essential aspects of this framework in the Data Types module. |
| UIKit | Provides dozens of classes for creating and controlling the user interface on iOS devices. |
| AppKit | Same as UIKit, but for OS X devices. |
| CoreData | Provides a convenient API for managing object relationships, supporting undo/redo functionality, and interacting with persistent storage. |
| MediaPlayer | Defines a high-level API for playing music, presenting videos, and accessing the user’s iTunes library. |
| AVFoundation | Provides lower-level support for playing, recording, and integrating audio/video into custom applications. |
| QuartzCore | Contains two sub-frameworks for manipulating images. The
CoreAnimation framework lets you animate UI components,
and CoreImage provides image and video
processing capabilities (e.g., filters). |
| CoreGraphics | Provides low-level 2D drawing support. Handles path-based drawing, transformations, image creation, etc. |
After you’re comfortable with Objective-C, these are some of the tools that you’ll be leveraging to build iOS and OS X applications. But again, this tutorial is not meant to be a comprehensive guide to app development—it’s designed to prepare you to use the above frameworks. With the exception of the Foundation Framework, we won’t actually be working with any of these libraries.
If you’re interested in Mac App development, you should take a look at Ry’s Cocoa Tutorial after you have a solid grasp on Objective-C. It shows you how to build OS X apps using the same hands-on methodology as this tutorial.
Xcode
Xcode is Apple’s integrated development environment (IDE) for Mac, iPhone, and iPad app development. It includes not only a source code editor, but also an interface builder, a device simulator, a comprehensive testing and debugging suite, the frameworks discussed in the previous section, and everything else you need to make apps.
While there are other ways to compile Objective-C code, Xcode is definitely the easiest. We strongly recommended that you install Xcode now so you can follow along with the examples in this tutorial. It is freely available through the Mac App Store.
Creating an Application
Xcode provides several templates for various types of iOS and OS X applications. All of them can be found by navigating to File > New > Project... or using the Cmd+Shift+N shortcut. This will open a dialog window asking you to select a template:
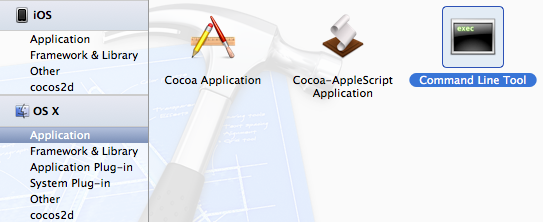
For this tutorial, we’ll be using the Command Line Tool template found under OS X > Application, highlighted in the above screenshot. This lets us strip away all of the elements specific to iOS/OS X and focus on Objective-C as a language. Go ahead and create a new Command Line Tool now. This opens another dialog asking you to configure the project:
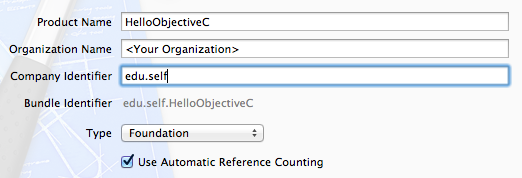
You can use whatever you like for the Product Name and
Organization Name fields. For the Company Identifier use
edu.self, which is the canonical private use identifier. For
production applications, you’ll need to get a real company ID from Apple
by registering as a
developer.
This tutorial utilizes several classes defined in the Foundation Framework, so be sure to select Foundation for the Type field. Finally, the Use Automatic Reference Counting checkbox should always be selected for new projects.
Clicking Next prompts you for a file path to store the project
(save it anywhere you like), and you should now have a brand new Xcode project
to play with. In the left-hand column of the Xcode IDE, you’ll find a
file called main.m (along with some other files and folders). At
the moment, this file contains the entirety of your application. Note that the
.m extension is used for Objective-C source files.
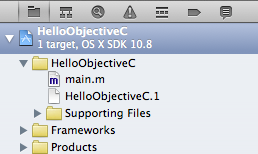
main.m in the Project NavigatorTo compile the project, click the Run button in the upper-left
corner of the IDE or use the Cmd+R shortcut. This should display
Hello, World! in the Output Panel located at the bottom
of the IDE:

The main() Function
As with plain old C programs, the main() function serves as the
root of an Objective-C application. Most of the built-in Xcode templates create
a file called main.m that defines a default main()
function. Selecting our main.m in Xcode’s Project
Navigator panel should open the editor window and display the
following.
#import<Foundation/Foundation.h>intmain(intargc,constchar*argv[]){@autoreleasepool{// insert code here...NSLog(@"Hello, World!");}return0;}
Inside of the @autoreleasepool block is where you can write
code and experiment with the snippets from this tutorial. The above
main() function simply calls the global NSLog()
function defined by the Foundation Framework. This is Objective-C’s
general-purpose tool for outputting messages to the console. Also note that
Objective-C strings are always prefixed with an at (@) symbol.
Throughout this tutorial, we’ll directly edit the above
main.m to see how new language features work, but in the real
world, you’ll probably never have to alter the main()
function provided by the template. For most applications, the only thing
main() needs to do is pass control of the program to the
“application delegate.” For example, the default
main() function for a Mac App project looks like the
following.
#import<Cocoa/Cocoa.h>intmain(intargc,constchar*argv[]){returnNSApplicationMain(argc,argv);}
But, since we’ll be sticking with command line tools, this is somewhat outside the scope of this tutorial. Application delegates are, however, an integral part of OS X and iOS development. The first several chapters of Ry’s Cocoa Tutorial explain them in full detail.
Get Ready!
The next two modules explore the basic C syntax. After that, we’ll be ready to dive into classes, methods, protocols, and other object-oriented constructs. This tutorial is chock-full of hands-on examples, and we encourage you to paste them into the template project we just created, mess with some parameters, and see what happens.
 |
Be sure to check out Ry’s Cocoa Tutorial. This brand new guide is a complete walkthrough of Mac App development, and it leverages all of the Objective-C skills that we just discussed. Learn more › |
Mailing List
Sign up for my low-volume mailing list to find out when new content is released. Next up is a comprehensive Swift tutorial planned for late January.
You’ll only receive emails when new tutorials are released, and your contact information will never be shared with third parties. Click here to unsubscribe.