You’re reading Ry’s Objective-C Tutorial |
Categories
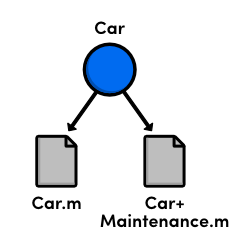
Categories are a way to split a single class definition into multiple files. Their goal is to ease the burden of maintaining large code bases by modularizing a class. This prevents your source code from becoming monolithic 10000+ line files that are impossible to navigate and makes it easy to assign specific, well-defined portions of a class to individual developers.

In this module, we’ll use a category to extend an existing class without touching its original source file. Then, we’ll learn how this functionality can be used to emulate protected methods. Extensions are a close relative to categories, so we’ll be taking a brief look at those, too.
Setting Up
Before we can start experimenting with categories, we need a base class to
work off of. Create or change your existing Car interface to the
following:
// Car.h#import<Foundation/Foundation.h>@interfaceCar:NSObject@property(copy)NSString*model;@property(readonly)doubleodometer;-(void)startEngine;-(void)drive;-(void)turnLeft;-(void)turnRight;@end
The corresponding implementation just outputs some descriptive messages so we can see when different methods get called:
// Car.m#import"Car.h"@implementationCar@synthesizemodel=_model;-(void)startEngine{NSLog(@"Starting the %@'s engine",_model);}-(void)drive{NSLog(@"The %@ is now driving",_model);}-(void)turnLeft{NSLog(@"The %@ is turning left",_model);}-(void)turnRight{NSLog(@"The %@ is turning right",_model);}@end
Now, let’s say you want to add another set of methods related to car
maintenance. Instead of cluttering up these Car.h and
Car.m files, you can place the new methods in a dedicated
category.
Creating Categories
Categories work just like normal class definitions in that they are composed
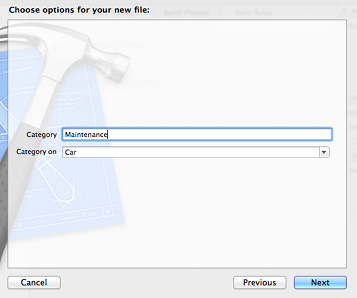
of an interface and an implementation. To add a new category to your Xcode
project, create a new file and choose the Objective-C category
template under iOS > Cocoa Touch. Use
Maintenance for the Category field and Car
for Category on.

Maintenance categoryThe only restriction on category names is that they don’t conflict
with other categories on the same class. The canonical file-naming convention
is to use the class name and the category name separated by a plus sign, so you
should find a Car+Maintenance.h and a
Car+Maintenance.m in Xcode’s Project Navigator
after saving the above category.
As you can see in Car+Maintenance.h, a category interface looks
exactly like a normal interface, except the class name is followed by the
category name in parentheses. Let’s go ahead and add a few methods to the
category:
// Car+Maintenance.h#import"Car.h"@interfaceCar(Maintenance)-(BOOL)needsOilChange;-(void)changeOil;-(void)rotateTires;-(void)jumpBatteryUsingCar:(Car*)anotherCar;@end
At runtime, these methods become part of the Car class. Even
though they’re declared in a different file, you will be able to access
them as if they were defined in the original Car.h.
Of course, you have to implement the category interface for the above methods to actually do anything. Again, a category implementation looks almost exactly like a standard implementation, except the category name appears in parentheses after the class name:
// Car+Maintenance.m#import"Car+Maintenance.h"@implementationCar(Maintenance)-(BOOL)needsOilChange{returnYES;}-(void)changeOil{NSLog(@"Changing oil for the %@",[selfmodel]);}-(void)rotateTires{NSLog(@"Rotating tires for the %@",[selfmodel]);}-(void)jumpBatteryUsingCar:(Car*)anotherCar{NSLog(@"Jumped the %@ with a %@",[selfmodel],[anotherCarmodel]);}@end
It’s important to note that a category can also be used to override
existing methods in the base class (e.g., the Car class’s
drive method), but you should never do this. The
problem is that categories are a flat organizational structure. If you override
an existing method in Car+Maintenance.m, and then decide you want
to change its behavior again with another category, there is no way for
Objective-C to know which implementation to use. Subclassing is almost always a
better option in such a situation.
Using Categories
Any files that use an API defined in a category need to import that category
header just like a normal class interface. After importing
Car+Maintenance.h, all of its methods will be available directly
through the Car class:
// main.m#import<Foundation/Foundation.h>#import"Car.h"#import"Car+Maintenance.h"intmain(intargc,constchar*argv[]){@autoreleasepool{Car*porsche=[[Caralloc]init];porsche.model=@"Porsche 911 Turbo";Car*ford=[[Caralloc]init];ford.model=@"Ford F-150";// "Standard" functionality from Car.h[porschestartEngine];[porschedrive];[porscheturnLeft];[porscheturnRight];// Additional methods from Car+Maintenance.hif([porscheneedsOilChange]){[porschechangeOil];}[porscherotateTires];[porschejumpBatteryUsingCar:ford];}return0;}
If you remove the import statement for Car+Maintenance.h, the
Car class will revert to its original state, and the compiler will
complain that needsOilChange, changeOil, and the rest
of the methods from the Maintenance category don’t exist.
“Protected” Methods
But, categories aren’t just for spreading a class definition over several files. They are a powerful organizational tool that allow arbitrary files to “opt-in” to a portion of an API by simply importing the category. To everybody else, that API remains hidden.
Recall from the Methods module that protected methods don’t actually exist in Objective-C; however, the opt-in behavior of categories can be used to emulate protected access modifiers. The idea is to define a “protected” API in a dedicated category, and only import it into subclass implementations. This makes the protected methods available to subclasses, but keeps them hidden from other aspects of the application. For example:
// Car+Protected.h#import"Car.h"@interfaceCar(Protected)-(void)prepareToDrive;@end
// Car+Protected.m#import"Car+Protected.h"@implementationCar(Protected)-(void)prepareToDrive{NSLog(@"Doing some internal work to get the %@ ready to drive",[selfmodel]);}@end
The Protected category shown above defines a single method for
internal use by Car and its subclasses. To see this in action,
let’s modify Car.m’s drive method to use
the protected prepareToDrive method:
// Car.m#import"Car.h"#import"Car+Protected.h"@implementationCar...-(void)drive{[selfprepareToDrive];NSLog(@"The %@ is now driving",_model);}...
Next, let’s take a look at how this protected method works by creating
a subclass called Coupe. There’s nothing special about the
interface, but notice how the implementation opts-in to the protected API by
importing Car+Protected.h. This makes it possible to use the
protected prepareToDrive method in the subclass. If desired, you
can also override the protected method by simply re-defining it in
Coupe.m.
// Coupe.h#import"Car.h"@interfaceCoupe:Car// Extra methods defined by the Coupe subclass@end
// Coupe.m#import"Coupe.h"#import"Car+Protected.h"@implementationCoupe-(void)startEngine{[superstartEngine];// Call the protected method here instead of in `drive`[selfprepareToDrive];}-(void)drive{NSLog(@"VROOOOOOM!");}@end
To enforce the protected status of the methods in
Car+Protected.h, it should only be made available to subclass
implementations—do not import it into other files. In the
following main.m, you can see the protected
prepareToDrive method called by [ford drive] and
[porsche startEngine], but the compiler will complain if you try
to call it directly.
// main.m#import<Foundation/Foundation.h>#import"Car.h"#import"Coupe.h"intmain(intargc,constchar*argv[]){@autoreleasepool{Car*ford=[[Caralloc]init];ford.model=@"Ford F-150";[fordstartEngine];[forddrive];// Calls the protected methodCar*porsche=[[Coupealloc]init];porsche.model=@"Porsche 911 Turbo";[porschestartEngine];// Calls the protected method[porschedrive];// "Protected" methods have not been imported,// so this will *not* work// [porsche prepareToDrive];SELprotectedMethod=@selector(prepareToDrive);if([porscherespondsToSelector:protectedMethod]){// This *will* work[porscheperformSelector:protectedMethod];}}return0;}
Notice that you can access prepareToDrive dynamically
through performSelector:. Once again, all methods in
Objective-C are public, and there is no way to truly hide them from client
code. Categories are merely a convention-based way to control which parts of an
API are visible to which files.
Extensions
Extensions are similar to categories in that they let you add methods to a class outside of the main interface file. But, in contrast to categories, an extension’s API must be implemented in the main implementation file—it cannot be implemented in a category.
Remember that private methods can be emulated by adding them to the implementation but not the interface. This works when you have only a few private methods, but can become unwieldy for larger classes. Extensions solve this problem by letting you declare a formal private API.
For example, if you wanted to formally add a private
engineIsWorking method to the Car class defined
above, you could include an extension in Car.m. The compiler
complains if the method isn’t defined in the main
@implementation block, but since it’s declared in
Car.m instead of Car.h, it remains a private
method. The extension syntax looks like an empty category:
// Car.m#import"Car.h"// The class extension@interfaceCar()-(BOOL)engineIsWorking;@end// The main implementation@implementationCar@synthesizemodel=_model;-(BOOL)engineIsWorking{// In the real world, this would probably return a useful valuereturnYES;}-(void)startEngine{if([selfengineIsWorking]){NSLog(@"Starting the %@'s engine",_model);}}...@end
In addition to declaring formal private API’s, extensions can be used to re-declare properties from the public interface. This is often used to make properties internally behave as read-write properties while remaining read-only to other objects. For instance, if we change the above class extension to:
// Car.m#import"Car.h"@interfaceCar()@property(readwrite)doubleodometer;-(BOOL)engineIsWorking;@end...
We can then assign values to self.odometer inside of the
implementation, but trying to do so outside of Car.m will result
in a compiler error.
Again, re-declaring properties as read-write and creating formal private API’s isn’t all that useful for small classes. Their real utility comes into play when you need to organize larger frameworks.
Extensions used to see much more action before Xcode 4.3, back when private methods had to be declared before they were used. This was inconvenient for many developers, and extensions provided a workaround by acting as forward-declarations of private methods. So, even if you don’t use the above pattern in your own projects, you’re likely to encounter it at some point in your Objective-C career.
Summary
This module covered Objective-C categories and extensions. Categories are a way to modularize a class by spreading its implementation over many files. Extensions provide similar functionality, except its API must be declared in the main implementation file.
Outside of organizing large code libraries, one of the most common uses of
categories is to add methods to built-in data types like NSString
or NSArray. The advantage of this is that you don’t have to
update existing code to use a new subclass, but you need to be very careful not
to override existing functionality. For small personal projects, categories
really aren’t worth the trouble, and sticking with standard tools like
subclassing and protocols will save you some debugging headaches down the
road.
In the next module, we’ll explore another organizational tool called blocks. Blocks are a way to represent and pass around arbitrary statements. This opens the door to a whole new world of programming paradigms.
 |
Be sure to check out Ry’s Cocoa Tutorial. This brand new guide is a complete walkthrough of Mac App development, and it leverages all of the Objective-C skills that we just discussed. Learn more › |
Mailing List
Sign up for my low-volume mailing list to find out when new content is released. Next up is a comprehensive Swift tutorial planned for late January.
You’ll only receive emails when new tutorials are released, and your contact information will never be shared with third parties. Click here to unsubscribe.